Let’s be brutally honest for a second: we have all been there. You are sitting in a comfortable circle of friends, the weekend vibe is absolutely impeccable, the music is floating through the air, and suddenly, someone hands you a beautifully cured botanical specimen and warmly expects you to do the honours. Instant panic sets in. Your palms get clammy. You bravely attempt to construct something remotely smokable, but what emerges from your trembling fingers resembles a crumpled receipt or a pregnant guppy rather than a majestic, slow-burning wand of joy. Welcome to the club. Rolling your own flower can seem wildly intimidating, but this comprehensive Beginners Guide is here to rescue you from the embarrassment of a poorly constructed zol.
In the grand, vibrant tapestry of weed culture, knowing how to confidently roll your own is an undeniable rite of passage. It is not just a means to an end; it is a deeply meditative, tactile ritual that connects you directly with the plant. But beyond the romance and tradition of it all, mastering the mechanics of the craft ensures a smooth, even-burning roll every single time for a flawless smoking experience. No more fighting with a joint that constantly goes out, no more canoeing down one side, no more mouthfuls of bitter ash, and certainly no more wasting your precious stash. This is cannabis education at its most fundamental and practical level. So, clear off your coffee table, take a deep, steadying breath, and let’s dive into this easy-to-follow tutorial that completely breaks down the entire process—from meticulously prepping your herb to that final, glorious spark.
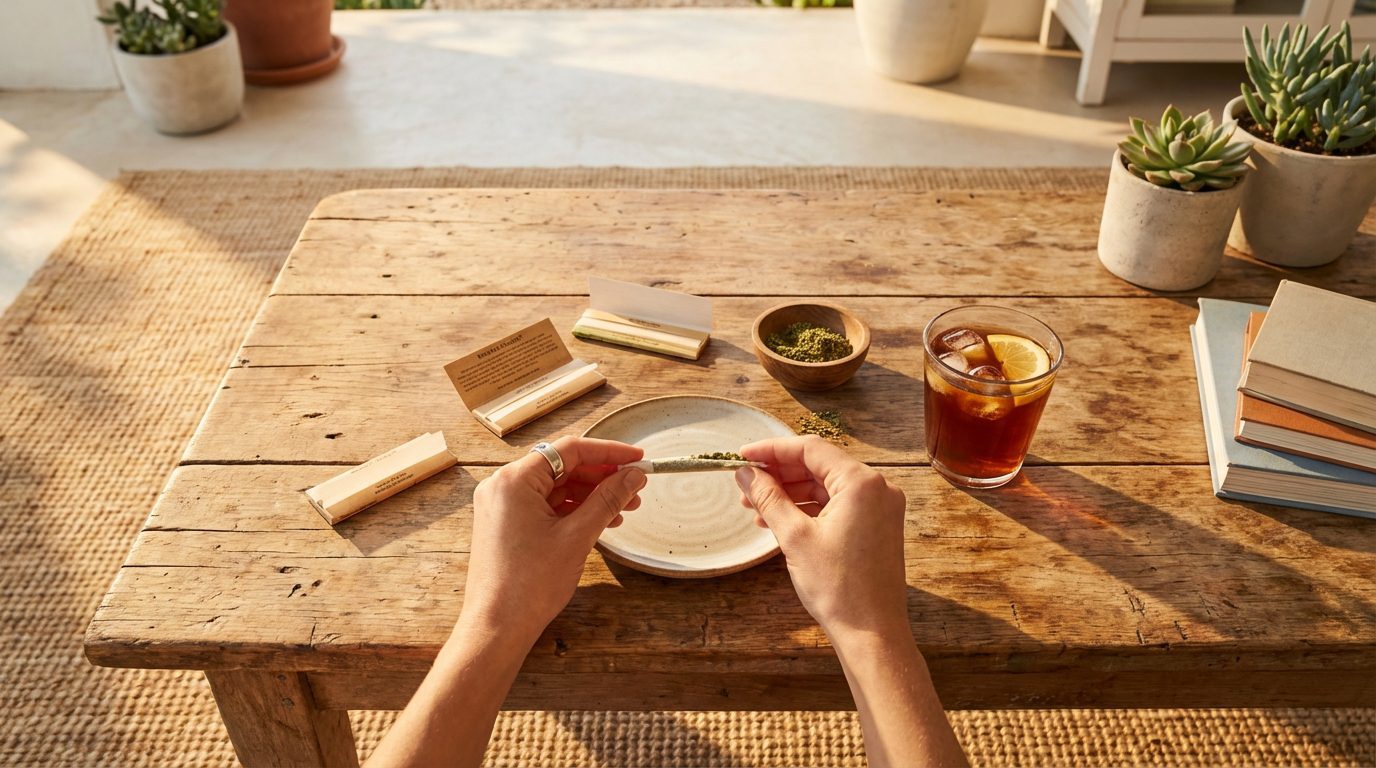
Step 1: Gather Your Arsenal (The Essential Supplies)
Before you can construct a masterpiece, you desperately need the right tools. Attempting your very first roll with sub-par, improvised equipment is like trying to paint a Renaissance fresco with a battered toothbrush. Proper preparation is the cornerstone of success. Here is exactly what you need to organise before you begin:
1. The Flower: You want high-quality herb that has been properly cured. If it is too dry, it will aggressively crumble to dust and burn up in mere seconds, leaving you with a hot, harsh smoke. If it is too wet or sticky, it will refuse to stay lit and will clog up airflow. You are looking for that perfect, slightly spongy middle ground that releases a rich, aromatic bouquet when gently squeezed.
2. The Grinder: Please, for the love of all things green, gracefully step away from the kitchen scissors or your bare hands. A quality two-piece or four-piece grinder ensures an incredibly even, uniform consistency, which is absolutely crucial for a steady, predictable burn. Hand-tearing leaves massive, dense chunks that will ruin the structural integrity of your roll.
3. The Papers and Tips: Pay close attention, because this is where the vast majority of beginners set themselves up for inevitable failure. Thick, cheap papers taste like a burning campfire and are notoriously stiff and difficult to manipulate. Using ultra-thin, high-quality papers with built-in tips is the ultimate secret to a smooth, manageable first roll. Do yourself a massive favour and grab the OCB Premium slim Papers with Tips. These papers are incredibly forgiving, almost transparent, and burn beautifully slowly. Furthermore, having the perfectly sized cardboard tips right there in the packaging takes all the frustrating guesswork out of the equation. It is undeniably the smartest investment you can make for your joint rolling journey.
4. A Rolling Tray: You need a dedicated, smooth, and flat surface to catch the inevitable overspill. Trying to roll over a carpet or a messy lap is a recipe for disaster and wasted herb. A proper rolling tray keeps your workspace civilised, hygienic, and neatly contained.
5. A Poker: You will need a slender, blunt object for the finishing touches. A standard pen refill, a specialised wooden packing tool, or even a clean shoelace aglet works perfectly to tamp down the top.
Step 2: The Prep (Grinding to Absolute Perfection)
Your beautiful flower needs to be broken down, but definitely not obliterated. Take a few medium-sized buds and meticulously pick out any pesky, rigid stems or rogue seeds. Stems are the enemy of a perfect roll—they act like tiny wooden spears that will mercilessly puncture your delicate paper from the inside out, ruining the vacuum seal. Place the clean flower into your grinder and give it a few solid, rhythmic twists.
You are aiming for a coarse, aerated, and fluffy consistency. Think of dried oregano rather than finely milled matcha powder. If you aggressively grind it into fine dust, the particles will tightly pack together, completely restricting the airflow and leaving you red-faced, gasping for a drag that simply will not come. Conversely, if you leave chunky, uneven boulders in the mix, your joint will burn erratically, resulting in the dreaded ‘canoe’ effect. Once ground, empty the fragrant, fluffy pile onto your rolling tray. Take a moment to genuinely savour the aroma; a massive part of cannabis education is appreciating the unique terpene profile and distinct flavour notes of what you are about to consume.
Step 3: Constructing the Foundation (The Essential Tip)
Some stubborn old-school purists might scoff at using a cardboard filter (often lovingly referred to as a ‘tip’ or ‘crutch’), but we are definitely not living in the Stone Age anymore. A well-crafted tip serves multiple vital physiological functions: it provides absolute structural integrity to the base of your roll, it creates a small cooling chamber for the smoke, it gives your fingers something solid to securely hold so you don’t burn your lips or nails, and most importantly, it entirely stops you from inhaling ‘Scooby snacks’ (those wildly unpleasant little crumbs of weed that shoot into the back of your throat).
Since you are wisely using your premium OCB setup, you already have the perfect, sturdy material readily on hand. Detach one of the cardboard tips from the booklet. Start by making a few tiny, crisp, accordion-style folds at one end—usually three or four distinct folds to form a visible ‘W’ or ‘M’ shape in the centre. Then, take the remaining flat length of the cardboard and firmly roll it around the ‘W’ until you have a neat, tightly bound cylindrical filter. It should be firm but not overly compressed, allowing for maximum, unobstructed airflow. Pop this little structural marvel to the side; it is about to confidently become the unwavering anchor of your masterpiece.
Step 4: Loading the Boat
Now, the real fun formally begins. Delicately pull out a single slim paper from your pack. You will clearly notice a narrow, shiny strip of natural adhesive running along one of the long edges. This is the crucial glue line. Hold the paper so the glue line is facing securely upwards and directly towards you. Gently fold the paper in half lengthwise and lightly pinch it along the bottom to create a definitive, soft crease. You have essentially just fabricated a little aerodynamic paper canoe.
Place your freshly crafted cardboard tip at one extreme end of the crease. Whether you consciously place it on the left or the right depends entirely on your dominant hand and sheer personal preference—there is strictly no wrong answer here. Once the tip is comfortably and securely seated, start carefully sprinkling your aerated, ground flower evenly along the remaining length of the crease.
Here is one of the most vital smoking tips you will ever receive in your life: absolutely do not overstuff the boat! It is without a doubt the most common rookie mistake. A massive, bulging, baseball-bat joint might look incredibly impressive on a social media feed, but it is an absolute nightmare to successfully roll and even harder to smoothly smoke. Start with a very modest, manageable amount—about half a gram is perfect for a beginner. Distribute the herb evenly, perhaps intentionally leaving a tiny bit less near the cardboard tip and slightly more towards the open end if you want to ambitiously attempt a classic, tapered cone shape.
Step 5: The Crucible (Shaping the Cylinder)
This exact stage is the make-or-break moment. This is where beginners gracefully transition into seasoned rollers. Pick up the paper carefully by pinching it between your thumbs and index fingers on both hands. Your thumbs should be positioned on the side closest to you, and your index fingers should be actively supporting the back.
Begin to gently and rhythmically roll the two sides of the paper up and down, delicately rubbing your thumbs against your index fingers. You are not trying to securely seal it just yet; you are simply using the slick surface of the paper to firmly massage the loose, chaotic herb into a neat, densely packed cylinder. Work your fingers patiently up and down the entire length of the joint, ensuring the internal density feels remarkably uniform. If you feel any hollow, empty pockets or unexpectedly hard lumps, gently massage them out. Slowly but surely, the herb will start to seamlessly take on the cylindrical shape of the paper, locking into a beautiful, cohesive, and springy log.
Step 6: The Tuck (The Ultimate Leap of Faith)
If shaping the cylinder is the crucible, the tuck is undeniably the ultimate leap of faith. This is universally recognised as the single hardest part of joint rolling, so if you somehow do not get it right on the very first try, absolutely do not panic. Your premium papers are surprisingly durable enough to easily withstand a few honest attempts.
With your thumbs, firmly push the non-glued edge of the paper down towards the beautifully compacted herb. Starting deliberately from the tip (this is critically crucial—the firm tip is your solid, unmoving foundation), use your thumbs to decisively roll the non-glued edge underneath the log of weed. You desperately want the paper to wrap snugly around the flower and tuck seamlessly and tightly behind it.
Once the paper is successfully tucked at the tip end, systematically work your way up the rest of the joint, smoothly continuing the exact same tucking motion. Keep the internal tension relatively firm. If it is drastically too loose, the joint will aggressively burn horribly fast and drop hot, dangerous cherries onto your favourite jeans. If you brutally tuck it too tightly, you simply won’t be able to draw any smoke through the dense blockage. You are carefully aiming for a glorious Goldilocks zone of firm, supportive, yet breathable tension.
Step 7: The Lick and Seal
Once the non-glued edge is beautifully tucked all the way up, gracefully roll the rest of the paper upwards until absolutely only the shiny adhesive strip remains exposed. Now, channel your inner, highly efficient envelope-sealer. Give the natural gum strip a very gentle, perfectly even lick. You do not need to drench it like a thirsty dog; wildly too much saliva will completely wash the delicate natural gum away or rapidly turn your paper into structurally compromised, soggy mush. A remarkably light, consistent moistening is genuinely all it takes.
Starting from the sturdy tip once again, confidently press the moistened glue strip firmly down onto the outside of the joint. Run your fingers lightly and smoothly along the entire length of the seam to absolutely ensure it is completely sealed and lying flawlessly flat. Take a deeply satisfying step back and proudly admire your handiwork. It might not be entirely ready for a contemporary art museum exhibit just yet, but it is authentically yours, and it is a beautiful thing.
Step 8: The Pack and Twist (The Finishing Touches)
You officially have a sealed joint, but the job is not quite finished yet. Look closely down the open, cavernous end of your roll. The weed is highly likely sitting a bit loose and unorganised near the very top. This is exactly where your trusty poker comes into play.
Hold the joint perfectly upright and use your pen refill, shoelace aglet, or packing tool to gently and repeatedly press the herb down. Do not aggressively ram it down like you are frantically loading a vintage musket in the middle of a battlefield; just press it gently until the top layer feels pleasantly firm to the touch. If you have some leftover, perfectly ground herb sitting on your rolling tray, you can carefully sprinkle a little more into the top opening and softly pack it down again. This ensures a wonderfully tight, perfectly even pack right up to the absolute brim.
Once neatly packed, you will noticeably have a bit of excess, empty paper at the very top. Pinch the edges of the empty paper and twist it firmly and tightly to seal the joint completely shut. This iconic twisted tip expertly does two things: it completely prevents your precious flower from tragically spilling out if you are casually tossing the joint in your pocket or tin for later, and it elegantly provides a perfect, easily ignitable little wick to ensure an exceptionally even light when it is finally time to spark up.
Step 9: The Spark (Ignition and Pure Enjoyment)
You did it. You successfully navigated the historically tricky waters of joint rolling. Now, it is time for the ultimate reward. However, even the most beautifully, meticulously rolled joint can be instantly ruined by a poor, rushed lighting technique.
Do not just carelessly shove the joint in your mouth and violently torch it while sucking vigorously like a vacuum cleaner. That is an absolute surefire way to instantly induce a nasty canoe. Instead, patiently hold the joint in your hand. Bring your lighter softly to the twisted paper tip and carefully ignite it. Slowly and rhythmically rotate the joint between your fingers, politely allowing the flame to consistently catch the edges of the twisted paper and deliberately create an even, brightly glowing ‘cherry’ across the entire, circular circumference of the tip.
Once the cherry is glowing an even, mesmerising bright orange, bring the joint to your lips and take a remarkably gentle, celebratory draw. Instantly savour the complex flavour, heavily enjoy the undeniably smooth draw provided by your meticulous rolling and premium papers, and take a moment to proudly pat yourself on the back.
Troubleshooting: The Agony of the Canoe
As an enthusiastic beginner, you will inevitably encounter the dreaded ‘canoe’ at some point—when one side of the joint aggressively burns significantly faster than the other, rapidly creating a shape tragically reminiscent of a hollowed-out wooden boat. If you immediately notice this happening, absolutely do not ignore it! It will quickly and ruthlessly ruin your perfectly planned smoking experience.
To cleverly fix a canoe mid-smoke, you can tactically apply a tiny bit of moisture (a delicate lick on the end of your finger) directly to the side of the paper that is burning far too fast. This brilliantly slows down the burn rate on that specific side, graciously allowing the slower side to quickly catch up. Alternatively, strategically hold the joint so the slower-burning side is directly facing down; since heat naturally rises, this can significantly help even things out. For your future rolls, strictly remember that canoeing is almost always caused by an uneven, chunky grind, incredibly uneven packing, or a rushed, uneven light. Consistent practice truly makes perfect.
Welcome to the Culture
Rolling your extremely first, completely perfect joint is an incredible, highly memorable milestone. It is a fundamental, deeply respected pillar of weed culture and a wonderfully practical skill that will generously serve you well at countless weekend braais, festive gatherings, and quiet, reflective evenings sitting on the stoep as the sun goes down. Please remember that absolutely nobody is born a master roller. It rightfully takes considerable patience, a bit of delicate finesse, and a humble willingness to proudly smoke a few ugly (but completely functional and lekker) joints along the way.
By wisely investing in the right, high-quality tools, particularly ultra-thin papers with brilliant built-in tips, and deliberately taking your sweet time with the crucial preparation and shaping phases, you have already successfully bypassed the most notoriously common beginner pitfalls. So keep eagerly practising, keep diligently refining your personal technique, and most importantly, warmly remember to always share the glorious fruits of your labour with truly good friends. Now, finally sit back, deeply relax, and unapologetically savour that flawless, incredibly slow-burning masterpiece you just magically created with your own two hands.
Keywords: Beginners Guide, Joint Rolling, Cannabis Education, Smoking Tips, Weed Culture