So, you’ve done it. You have successfully navigated the treacherous waters of germination, you’ve battled the nutrient burn, you’ve spotted the spider mites before they established a colony, and you’ve watched your ladies stretch and swell into magnificent, frosty towers. You are standing at the finish line of a months-long marathon, staring at the most beautiful home grow you have ever produced. But here is the hard truth that breaks hearts every season: you can ruin a perfect harvest in the final ten metres. You can grow the finest genetics in the world, feed them the most premium nutrients, and sing them lullabies every night, but if you fumble the harvest, drying, and curing phase, you might as well have been growing lawn clippings.
Respecting the harvest is about understanding that the job isn’t done when you chop the plant. In fact, for the true connoisseur, the real work—the alchemy that turns raw plant matter into a smooth, flavourful, premium smoke—is just beginning. It is a test of patience. It is the difference between that harsh, grassy hay smell that haunts amateur setups and the complex, nose-tingling terpene profile of top-shelf cannabis. Today, we are diving deep into the essential dos and don’ts of handling your homegrown. Grab a notepad, bru; class is in session.
The Science of Patience: Why Curing Matters
Before we get into the checklist, let’s quickly address the ‘why’. When you cut your plant down, it doesn’t die immediately. It begins a process of degradation. Your goal is to manage this process to halt the breakdown of the good stuff (cannabinoids and terpenes) while encouraging the breakdown of the bad stuff (chlorophyll and starches). Chlorophyll is what gives plants their green colour, but in your smoke, it provides a harsh, bitter flavour and the dreaded smell of fresh-cut grass. Proper drying and curing allow enzymes to break down that chlorophyll, revealing the underlying terpene profile. It also allows THCa to stabilise. If you rush this, you lock the chlorophyll in. If you dry it too fast, you evaporate the terpenes. It is a delicate dance, but if you follow these steps, you will be waltzing your way to a perfect session.
DO: Master the Harvest Window
Do not just guess when your plants are ready. The ‘pistil method’ (looking at the little hairs turning brown) is a good indicator, but it isn’t precise. To truly respect your harvest, you need to look at the trichomes—those tiny, mushroom-shaped crystals coating the buds. You will need a jeweller’s loupe or a USB microscope for this.
If the trichomes are clear, the plant is not ready; harvesting now will result in a weak, racy high. If they are all cloudy or milky white, THC is at its peak levels. If they are turning amber, the THC is degrading into CBN, which produces a heavier, ‘couch-lock’ body stone. Most growers aim for a mix—mostly cloudy with about 10% to 20% amber. Do check your trichomes daily in the final week. Timing is everything.
DON’T: Wet Trim if You Can Avoid It
There is a massive debate in the cannabis community between ‘wet trimming’ (cutting off fan leaves and sugar leaves immediately after harvest) and ‘dry trimming’ (hanging the whole plant to dry and trimming later). While wet trimming seems easier because the leaves stick out, do not do it if you want the highest quality smoke.
Leaving the leaves on during the drying process acts as a protective hull around your buds. It slows down the drying process, which is exactly what you want. A slower dry preserves more terpenes. When you wet trim, you slice open plant cells, releasing chlorophyll directly onto your sticky buds, which can lead to that grassy smell. Unless you live in an incredibly humid area with a high risk of mould, always opt for a dry trim.
DO: Control Your Environment (The 60/60 Rule)
This is the golden rule of drying. You want your drying room to be as close to 60°F (about 15-16°C) and 60% relative humidity as possible. We call it the 60/60 rule. If the humidity is too low (below 50%), your buds will dry too fast, becoming crispy on the outside while staying wet on the inside. This destroys terpenes. If the humidity is too high (above 70%), you are rolling out the red carpet for Botrytis (bud rot) and powdery mildew.
Do invest in a decent hygrometer (humidity monitor) for your drying space. Keep the air moving with oscillating fans, but never—and I mean never—point a fan directly at the drying plants. You want air circulation, not a wind tunnel. You are drying them, not dehydrating them.
DON’T: Rush the Dry with Heat
We have all heard the horror stories. The impatient grower who puts their fresh harvest in the oven, the microwave, or on top of the radiator. Please, for the love of the plant, do not do this. Heat is the enemy of quality. Terpenes are volatile organic compounds; they evaporate at relatively low temperatures. If you heat-dry your weed, you are evaporating the flavour and the effect.
If your buds dry in three days, you have failed. A proper dry should take anywhere from 10 to 14 days. You will know they are ready for the curing jar when the small stems snap cleanly rather than bending. If they bend, there is still too much moisture in the stalk. Patience is the only way.
DO: Cure in Glass, Not Plastic
Once your buds are dry and trimmed, it is time for the cure. This is where the magic happens. Do use airtight glass jars—mason jars are the gold standard. Plastic containers or bags can carry a static charge that pulls trichomes off the buds. Plastic is also slightly porous and can affect the flavour over time.
Fill your jars about 75% full. The buds need a little breathing room; do not cram them in tight. Place a small hygrometer inside the jar. You are aiming for an internal humidity of 58% to 62%. If it climbs above 70%, take the buds out and let them dry more. If it drops below 55%, you have over-dried them (you can try to rehydrate with humidity packs, but the terpene damage is likely done).
DO: Burp Your Jars
During the first two weeks of curing, you must ‘burp’ your jars. This simply means opening the lid for 10 to 15 minutes once or twice a day. This releases the moisture and gases that have been drawn out from the centre of the bud and replenishes the oxygen required for the curing bacteria to do their work. After the first two weeks, you can reduce this to once every few days. A proper cure lasts at least a month, but many growers swear that two to three months produces the smoothest smoke imaginable.
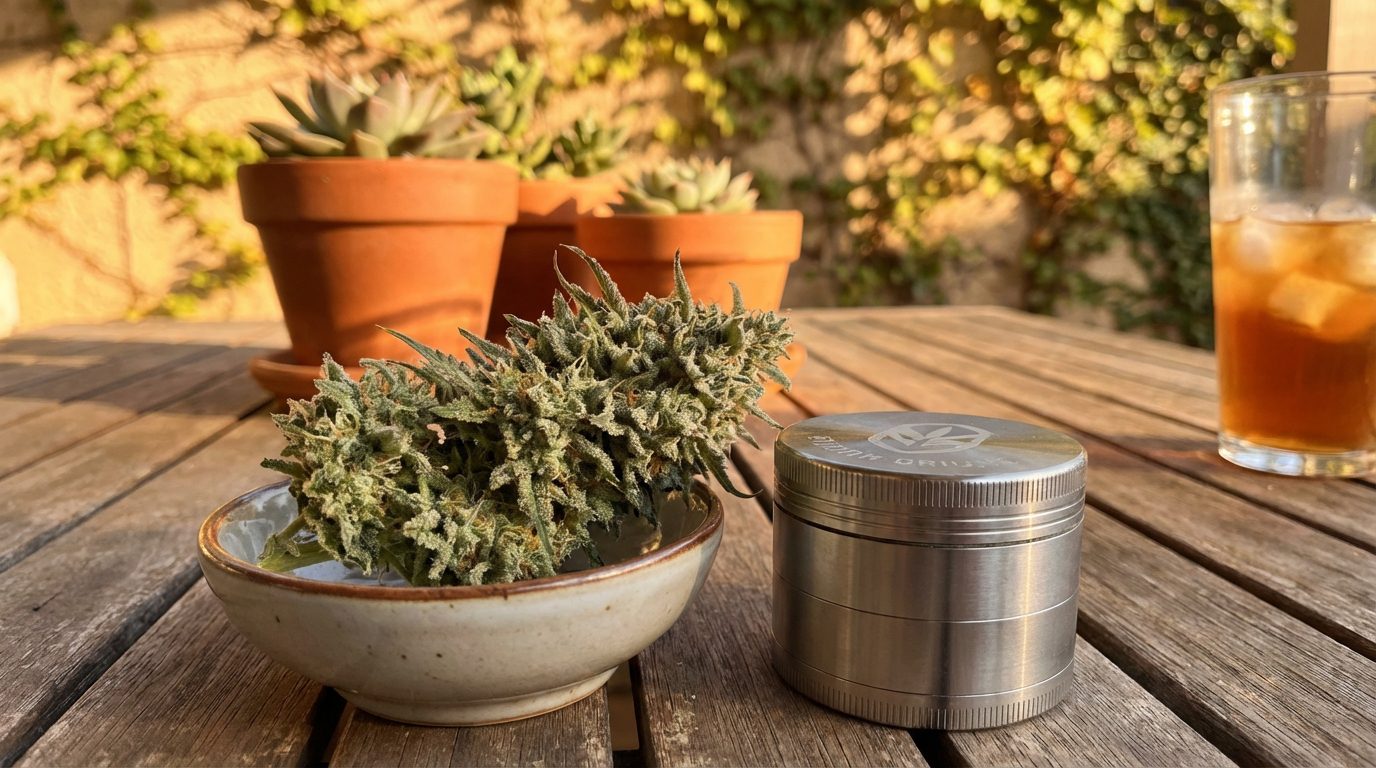
DO: Treat Your Buds with Respect When Consuming
So, you have grown it, dried it slowly, and cured it to perfection. You have a jar of sticky, pungent, high-grade cannabis. Now, how do you prepare it for a joint or a vape? This is a critical ‘Do’ that most people overlook. Do not mangle your buds with cheap plastic grinders that shred and tear the plant matter.
Standard grinders with sharp teeth rely on friction and tearing. This violence creates heat (destroying terpenes) and often smashes the delicate trichome heads—the very things you spent months cultivating—against the casing, leaving the potency in the grinder rather than in your joint. If you want to respect the harvest, you need to change how you process your flower.
For the ultimate experience, you want to mill your herb, not grind it. This is why we recommend the Flower Mill, Next Gen Premium, 2.5 Stainless steel. Unlike traditional grinders that shred, this device uses a toothless milling mechanism that gently crumbles the herb where it naturally wants to break apart. It progressively processes the bud, separating the flower from the stem without crushing the trichomes. The result is a lighter, fluffier consistency that burns more evenly and tastes significantly better because the terpene profile hasn’t been compromised by heat or friction. It is constructed from food-grade stainless steel, meaning no aluminium shavings in your smoke. If you have put in the work to grow top-tier cannabis, you owe it to yourself to use a tool that preserves the quality rather than degrading it right before the finish line.
DON’T: Store in Direct Sunlight
Once your cure is finished, long-term storage becomes the priority. Light, specifically UV light, degrades THC rapidly, converting it into CBN. While CBN is great if you want to sleep, it’s not ideal if you are looking for that potent psychoactive effect. Do not leave your beautiful glass jars sitting on a windowsill or a coffee table bathed in sunlight. Store your jars in a cool, dark cupboard. If you want to go the extra mile, invest in UV-proof glass jars, but a dark cupboard works just fine for most home growers.
DO: Handle with Care
Trichomes are fragile. They are essentially tiny bubbles of oil sitting on a microscopic stalk. Every time you touch your buds, squeeze them to check density, or shake the jar violently, you are rupturing those heads and losing potency. Handle your buds by the stem whenever possible. Treat them like precious gems, because in terms of time and energy invested, that is exactly what they are.
DON’T: Ignore Hygiene
This sounds obvious, but you would be surprised. Do not handle your harvest with dirty hands. Your skin carries oils and bacteria that can encourage mould growth, especially when you are putting the buds into a sealed jar for weeks. Wear nitrile gloves when trimming. Sterilise your trimming scissors with isopropyl alcohol. Keep your drying area clean and dust-free. You don’t want to be smoking pet hair and dust mites.
DO: Keep a Grow Journal
Memory is a fickle thing. You might think you will remember exactly how many days you dried this harvest or what the humidity was, but you won’t. Do keep a detailed log of your drying and curing process. Record the temperatures, the humidity levels, how long you hung the plants, and how the final product smoked. This data is invaluable for dialling in your process for the next run. Every environment is different, and finding the perfect recipe for your specific location takes trial and error.
The Final Toke
Growing cannabis is a journey that teaches patience and attention to detail. The cultivation phase is exciting, watching the plants grow is rewarding, but the post-harvest phase is where the masters are separated from the amateurs. It requires a different kind of discipline—the discipline to wait, to monitor, and to refuse to cut corners.
By following these dos and don’ts, you ensure that the months of watering, feeding, and worrying result in a product that rivals anything you can find on the top shelf of a dispensary. Remember to dry slowly, cure patiently, and when the time finally comes to taste your creation, use the right tools like the Flower Mill to ensure you are getting the full expression of the plant. Respect the harvest, and the harvest will respect you back with a smoke that is smooth, flavourful, and utterly satisfying. Happy growing, and stay lifted.
Keywords: Home Grow, Cannabis Curing, Harvest Tips, Cannabis Accessories, Terpenes