So, you’ve done it. You’ve successfully navigated the treacherous waters of germination, you’ve lovingly adjusted light cycles, you’ve battled the occasional nutrient burn, and you’ve perhaps even had a stern conversation with a spider mite or two. After months of patience, pruning, and smelling that sweet, sticky aroma fill your designated grow space, you have finally harvested your home grow. Congratulations! You deserve a bells, or at least a very well-packed cone. But before you rush to spark up that victory lap, pause for a moment. The journey from soil to smoke isn’t quite over yet. In fact, how you handle your cannabis in these final stages—curing, storing, and eventually milling—can make the difference between a harsh, grassy smoke and a smooth, terpene-rich experience that rivals the top-shelf buds at a dispensary.
Many enthusiastic growers make the fatal mistake of thinking the hard work ends when the branches are chopped. They rush the dry, skip the cure, or worse, take their pristine, crystal-coated buds and pulverise them into dust with a cheap plastic grinder. It is a tragedy of Shakespearean proportions. You have spent months cultivating those delicate trichomes; destroying them in the final seconds is simply not the way. To ensure your stash lives up to its potential, we have compiled the essential dos and don’ts of prepping your home grow, taking you from the curing jar all the way to the perfect cone.
The Drying Phase: Don’t rush the Snap
Let’s start with the immediate aftermath of the harvest. Drying is not merely about removing water; it is about preserving chemical integrity. A common error is trying to speed dry cannabis using heaters, fans blowing directly onto the buds, or—heaven forbid—an oven. If you do this, you might as well be smoking lawn clippings. Rapid drying traps chlorophyll in the plant matter, resulting in that dreaded ‘hay’ smell and a harsh throat hit that will have you coughing up a lung.
Do: Aim for a slow, controlled dry. You want a dark room with good air circulation (but no direct breeze on the plants) and a temperature around 18–21°C with humidity hovering near 50–60%. This process should take anywhere from 7 to 14 days.
Don’t: Trim wet if you live in a dry climate. Leaving the sugar leaves on during drying acts as a protective layer, slowing down the moisture loss. Conversely, if you are in a very humid part of South Africa (looking at you, Durban), a wet trim might help prevent mould. Know your environment.
The test is simple: the ‘snap’ test. Bend a small stem. If it bends without breaking, it’s too wet. If it snaps cleanly, you are ready for the next phase. If the bud crumbles into dust when you touch it, you’ve gone too far.
The Art of the Cure: Do Burp Your Jars
Curing is where the magic happens. It is the fermentation process of the cannabis world. During curing, bacteria and enzymes break down the remaining starches and chlorophyll, smoothing out the flavour and allowing the terpene profile to mature and shine. This is what turns ‘okay’ weed into ‘spectacular’ weed.
Do: Use airtight glass jars. Fill them about 75% full to allow for some air exchange. For the first two weeks, open the jars (burp them) once or twice a day for 15 minutes to let fresh air in and moisture out. Monitor the humidity inside the jar; you are aiming for a sweet spot of 58–62%.
Don’t: Use plastic sandwich bags for long-term curing. Plastic is porous and carries a static charge that can literally pull trichomes off your buds. Furthermore, avoid stuffing the jars too tight. If the buds are squashed together, mould becomes a very real and heartbreaking risk. If you smell ammonia when you open the jar, bacteria are feasting on moisture—take the buds out immediately and let them dry further before re-jarring.
Handling: Don’t Manhandle the Goods
We know it is tempting. You want to squeeze the nugs to check density, or you want to show off the sticky resin to your mates. But every time you touch a bud, you are rupturing trichomes. Trichomes are those microscopic, mushroom-shaped crystals that coat the flower. They house the vast majority of the cannabinoids (THC, CBD) and terpenes (flavour and aroma). When you touch them with your bare hands, the resin sticks to your fingers. That sticky residue on your thumb? That’s the medicine you wanted to smoke, now wasted on your skin.
Do: Handle your buds by the stem whenever possible. Treat them like volatile explosives or a very expensive piece of jewellery.
Don’t: Shake the jar vigorously. While we said ‘don’t squash them’, you also don’t want them rattling around like marbles, knocking the crystals off one another. Gentle movements are key. If you must handle the flower for trimming or inspection, consider wearing powder-free latex gloves to keep your oils off the plant and the plant’s oils off you.
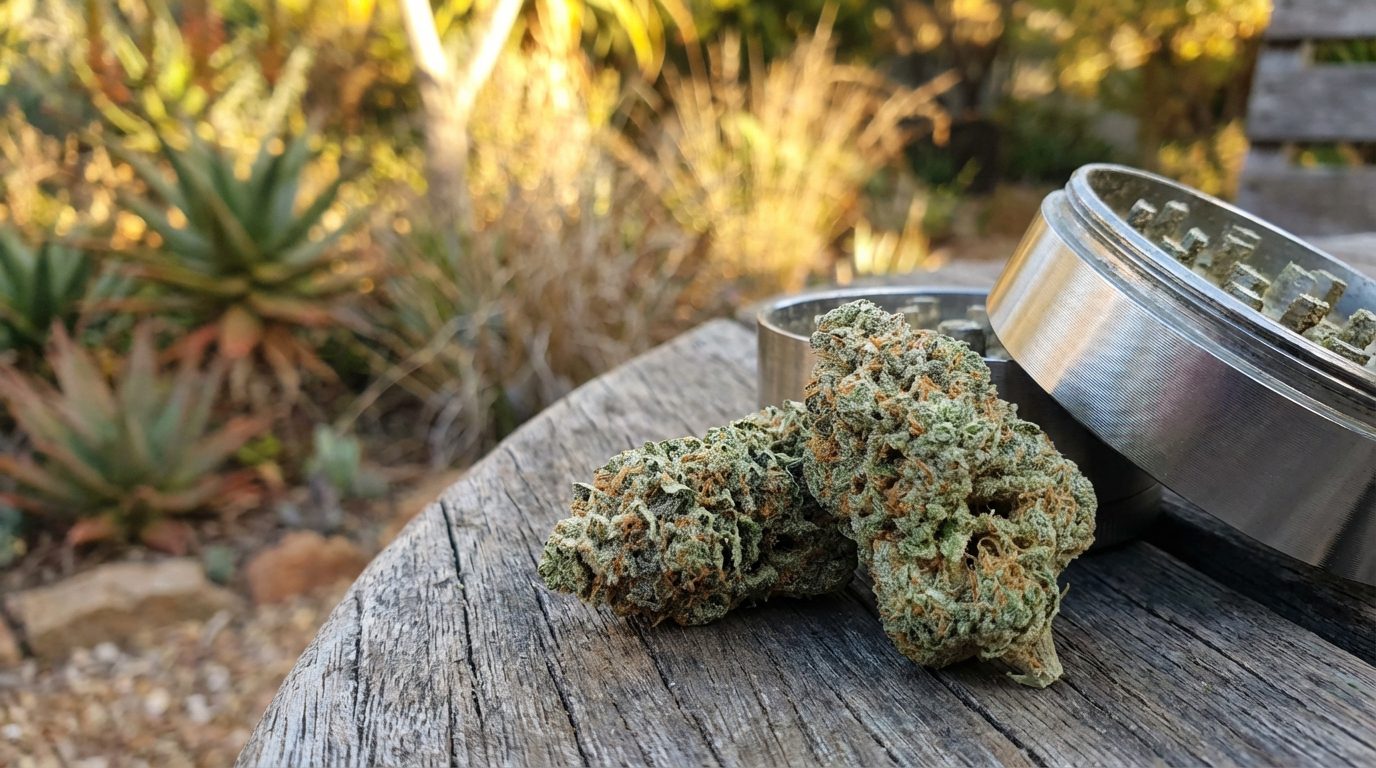
The Grind: Don’t Crush, Do Mill
Here we arrive at the most overlooked aspect of consumption: breaking the herb down. After growing, drying, and curing your cannabis to perfection, the texture of the flower is delicate. The trichomes are brittle and ready to release their payload. The standard approach for years has been the jagged-tooth grinder—two plates of metal teeth that shred, tear, and rip the plant apart. While this gets the job done, it is essentially a violent act against your flower.
Traditional grinding creates friction and heat, which can degrade volatile terpenes. Worse, the shredding action often pulverises the plant material into a powder rather than a fluffy consistency, and in the process, smashes the trichome heads, smearing the resin over the teeth of the grinder rather than keeping it on the plant matter where it belongs. You want your cannabis to be fluffy and aerated for optimal airflow in a joint or vaporiser, not a dense, sticky puck.
This brings us to the superior method: milling. Milling is distinct from grinding. Instead of shredding, a mill gently crumbles the herb. It works with the natural structure of the dried flower, separating the softer plant matter from the stems without crushing the trichomes. This results in a lighter, fluffier consistency that burns more evenly and tastes significantly better because the terpene profile remains intact.
If you are serious about preserving the quality of your home grow, you need to invest in equipment that respects the plant. We highly recommend the Flower Mill, Next Gen Premium, 2.5 Stainless steel. Unlike conventional grinders that rely on teeth to tear the bud, this premium mill utilises a rotor to gently roll the herb across a screen. The flower naturally crumbles where it wants to, falling through the screen only when it is the perfect size. This progressive milling action leaves the stems behind and preserves the integrity of those precious trichomes you spent months growing. It is made from food-grade stainless steel, ensuring no aluminium shavings end up in your mix, and it turns the chore of prepping your herb into a smooth, effortless ritual. Why grow top-shelf cannabis only to treat it like oregano?
Storage: Do Keep It Cool and Dark
Once your cannabis is cured and you are dipping into your stash, long-term storage becomes the priority. The enemies of cannabis are light, heat, air, and moisture. UV light, in particular, rapidly degrades THC into CBN, which is the cannabinoid that makes you feel sleepy and lethargic rather than high. Heat will dry out the oils, killing the flavour.
Do: Store your jars in a cupboard or a drawer. If you want to be extra professional, use UV-protected glass jars (often dark violet or brown). Maintain a stable temperature; a cool room is fine.
Don’t: Put your weed in the fridge or freezer. This is a common myth. The fluctuating temperatures when you open the fridge door can cause condensation to form inside the jar, leading to mould. Freezing can cause the trichomes to become brittle and snap off, reducing potency. The bottom of your sock drawer is a safer bet than the vegetable crisper.
The Roll: Don’t Overpack
Finally, we reach the cone. Whether you are rolling a joint, packing a pipe, or loading a vaporiser, airflow is king. This connects directly back to how you milled your flower. If you used a shredder that created a powder, you are likely to pack it too tight, resulting in a joint that canoes (burns down one side) or clogs up.
Do: Use the fluffy, milled consistency to your advantage. Pack it gently. If you are rolling, tap the joint on a hard surface to settle the contents rather than shoving it down with a poker. You want air to be able to pass through the material to fuel the combustion.
Don’t: Use bleached, thick rolling papers. You have spent months ensuring your cannabis is chemical-free and organic; don’t wrap it in paper that tastes like a newspaper. Opt for thin, unbleached hemp or rice papers to ensure you are tasting the terpenes, not the cellulose.
Conclusion
Growing cannabis is a labour of love, a lesson in patience, and a rewarding hobby. But the difference between a master grower and a novice often lies in the post-harvest details. By respecting the cure, handling your buds with care, and upgrading your accessories to include a proper milling tool, you ensure that every session is a celebration of your hard work. Treat your harvest with respect, and it will return the favour ten-fold. Now, go check those humidity packs, grab your mill, and enjoy the fruits—or rather, the flowers—of your labour.
Keywords: Home Grow, Cannabis Cultivation, Terpenes, Cannabis Accessories, Harvesting